![Notify_Refresh_MasterLogo_CMYK[1]](https://helpcentre.notifytechnology.com/hs-fs/hubfs/Notify_Refresh_MasterLogo_CMYK%5B1%5D.png?width=291&height=117&name=Notify_Refresh_MasterLogo_CMYK%5B1%5D.png)
How to assign a logo to a specific part of your organisation structure
1. Go to Organisation Structure
Select Organisation Structure from the left hand menu.
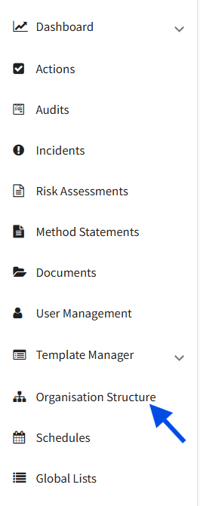
If you can't see Organisation Structure, you'll need to ask your System Administrator to provide you with the Organisational Chart Manager permission.
2. Choose the business unit or division you want to update
Click on the area in your structure where the logo should be applied.

3. Click on 'Upload Logo'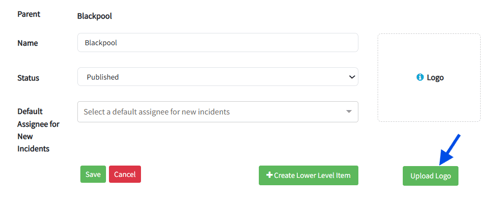
4. Upload your logo
Select the logo file from your device and save the changes.
5. Click Save The logo is only uploaded when you save the area, so always click Save before leaving the page.
Supported logo files
- Maximum file size: 10 MB
- Supported formats: JPG, JPEG, PNG, GIF
- Recommended: minimum size 180px x 50px, with a solid background (ideally white)
How does the logo appear on documents?
Once a logo is assigned to a part of your structure, it is applied automatically to PDF exports linked to that area. This keeps branding consistent without anyone swapping logos by hand, which is really useful for organisations that operate under multiple brands.
Example
A company operates two brands: ABC Manufacturing and SafeBuild Services.
- ABC uploads its logo to the ABC branch of the structure.
- SafeBuild uploads theirs to the SafeBuild branch.
If a user creates a report or RAMS pack from SafeBuild Services, the SafeBuild logo appears automatically. Documents generated from ABC Manufacturing display the ABC logo.
What happens next
- The logo shows immediately in the details panel for that area of the structure.
- New PDF exports generated from records linked to that area use the new logo. Documents exported before the change are not updated.
- To change the logo later, select the area, remove the existing logo using the bin icon under the preview, or simply upload a new file, then click Save.
Troubleshooting
- I can't see Organisation Structure in the menu: your account does not have the Organisational Chart Manager permission group. Ask your System Administrator to add it to your account.
- I can see the structure but there is no Upload Logo button or my upload is rejected: uploading also requires the Organisational Chart Manager group. If you were given a different permission group (for example Organisational Change Manager), ask your System Administrator to add Organisational Chart Manager instead.
- I get "Maximum picture size of 25 MB exceeded": your image file is larger than 25 MB. Resize or compress it and try again.
- I get "Unsupported file type": the logo must be a JPG, JPEG, PNG or GIF file. Convert the image and try again.
- My new logo isn't appearing on a document: check the record was created under the area of the structure that holds the logo, and that you clicked Save after uploading. Exports generated before the logo was saved keep the old branding.